 Spotweb is a usenet indexing application that processes ‘spots' of useful content on usenet. It has a simple interface for showing the latest spots and associated nzbs. The Spotweb framework provides a newznab compatible API that can be used with automation software like Sonarr, SickRage, CouchPotato, Headphones, Mylar, LazyLibrarian and more. The Banana Pi works as a Spotweb personal usenet indexer quite well and was chugging along for a month finding new spots every hour during testing. This guide should work on any Ubuntu/Debian Linux based system including other SBCs like the Raspberry Pi, Orange Pi, ODROID, Hummingboard, Cubieboard and others.
| Pi Unit | ||||||||
|---|---|---|---|---|---|---|---|---|
| Raspberry Pi 3 | Quad Core | |||||||
| Raspberry Pi 2 | Quad Core | |||||||
| Raspberry Pi | Single Core | |||||||
| Banana Pi | Dual Core | |||||||
| Banana Pi Pro | Dual Core |
Install Spotweb on Banana Pi for Personal Usenet Indexer
Spotweb requires several components to function
- MySQL database for storing the category of spots and nzbs
- PHP for processing headers and displaying the Spotweb web interface
Install MySQL
Update your repositories
sudo apt-get updateInstall MySQL to store Spots and nzbs
sudo apt-get install mysql-server -yEnter your MySQL as the root user
mysql -u root -pCreate a MySQL user for spotwebuser, create the database called spotwebdb and grant privileges to the spotwebuser.
CREATE USER spotwebuser@localhost IDENTIFIED BY 'password';
CREATE DATABASE spotwebdb;
GRANT ALL PRIVILEGES ON spotwebdb.* TO spotwebuser@localhost IDENTIFIED BY 'password';
FLUSH PRIVILEGES;
exit
Install PHP
Install PHP or Spotweb won't run
sudo apt-get install php5-mysql php5-curl php5-gd php5-cli -yChange your timezone for php
sudo nano /etc/php5/fpm/php.iniUncomment ;date.timezone= by deleting the semicolon, a list of timezones can be found here
date.timezone = Europe/CopenhagenYou can adjnust the amount of memory php can use though I have found that Spotweb indexing is more CPU intensive than anything else.
memory_limit = 512MCtrl+X, Y and Enter to Save
Make the same changes in the command line php.ini since this is what is used for grabbing new headers
sudo nano /etc/php5/cli/php.iniInstall nginx
Install nginx and php5-fpm for serving PHP, SSL is included in case you want to use https
sudo apt-get install nginx openssl php5-fpm -yCreate the Spotweb nginx vhost configuration
nano /etc/nginx/sites-available/spotwebHere is the Spotweb nginx configuration adapted from here
server {
	listen 80;
	server_name htpcguides.crabdance.com, 192.168.40.120;
	root /var/www;
	index index.html index.htm index.php;

	location /spotweb {

        satisfy any;

        if ($uri !~ "api/"){
                rewrite /api/?$ /spotweb/index.php?page=newznabapi last;
        }
	location ~ \.php$ {
                try_files $uri =404;
                include fastcgi_params;
                fastcgi_pass unix:/var/run/php5-fpm.sock;
                fastcgi_param  SCRIPT_FILENAME    $document_root$fastcgi_script_name;
		}
	}
}
Disable the default nginx virtual host and enable the nginx Spotweb virtua host
unlink /etc/nginx/sites-enabled/default
ln -s /etc/nginx/sites-available/spotweb /etc/nginx/sites-enabled/spotweb
Install Spotweb on Banana Pi
Install git so you can get the Spotweb source
apt-get install git -yGrab the latest Spotweb
git clone https://github.com/spotweb/spotweb /var/www/spotwebChange the owner of Spotweb to be www-data so nginx has access to it
chown -R www-data:www-data /var/www/spotwebRestart nginx and php5-fpm
service nginx restart
service php5-fpm restart
Configure Spotweb
Go to http://ip.address/spotweb/install.php and replace ip.address with your local IP address to begin configuring Spotweb
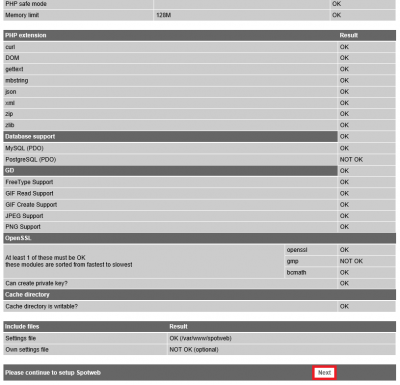
This is the Spotweb php check to make sure you have all the dependencies, click Next
Enter your MySQL database name, username and password we created earlier and click Verify database
Choose your Usenet server from the dropdown and enter your credentials, click Verify usenet server
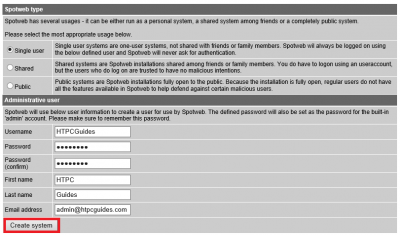
Now it's time to create the site type and an Administrative user. I chose Single user since this is a personal indexer I won't be sharing with anybody, click Create system when you are done
Installation is now complete
Now navigate to http://ip.address/spotweb and let's start the initial retrieve process
Click Config in the top right and then Settings
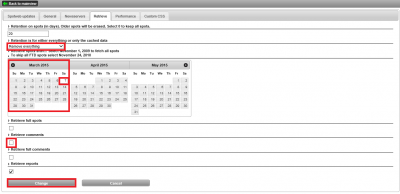
Click the Retrieve tab
Set your retrieve settings and then run the initial retrieval manually. It will take a very long time depending on how far back you have chosen to index.
Move forward in time in the calendar to choose the date from which to index. In the example below spots from March 2015 onwards will be indexed
Consider unchecking comments as it requires more time to process.
Run the Spotweb retrieve in a screen session so you can close the SSH session and still let it run in the background
sudo apt-get install screen -yEnter a screen session
screenRun the Spotweb retrieve script
php /var/www/spotweb/retrieve.phpNow you can close the SSH and re-attach the screen session to see how it's doing
screen -rWhen the initial Spotweb retrieval is done add a cronjob to have your spots updated at a fixed interval. This cronjob checks for new spots every 30 minutes, you can increase or decrease it if you want.
It will create a fresh log file every hour on the hour at /var/www/spotweb/retrieve.log
crontab -l | { cat; echo "00 * * * * php /var/www/spotweb/retrieve.php > /var/www/spotweb/retrieve.log"; } | crontab -If you find this isn't working try changing /var/www/spotweb/retrieve.log to >/dev/null 2>&1
crontab -l | { cat; echo "00 * * * * php /var/www/spotweb/retrieve.php > /dev/null 2>&1"; } | crontab -When adding Spotweb as an indexer for automation sfotware like Sonarr, SickRage, CouchPotato, Mylar, Headphones, LazyLibrarian and others. Choose newznab as the indexer type. The URL is http://192.168.40.120/spotweb/ where 192.168.40.120 is your Spotweb indexer's IP address.
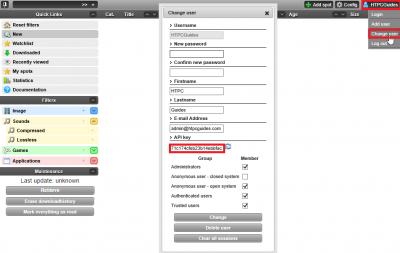
You can get your Spotweb API key by clicking your username in the top right corner and choosing Change User, scroll down to API Key and copy it to the clipboard and paste it in your automation software.
Move the SQL Database
It is a good idea to move your Spotweb MySQL database off the SD card, if you plan on retaining a lot of spots and nzbs you will eventually run out of space on the SD card.
Stop MySQL and gninx temporarily
sudo service mysql stop
sudo service nginx stop
Make a MySQL directory on your USB or SATA drive and change the owner to mysql
mkdir -p /mnt/usbstorage/mysql
sudo chown -R mysql:mysql /mnt/usbstorage/mysql
Copy the database over
cp -r /var/lib/mysql/ /mnt/usbstorage/mysqlChange the MySQL configuration
sudo nano /etc/mysql/my.cnfFind this line and adjust it to your USB storage path's mysql folder
datadir = /var/lib/mysqlCtrl+X, Y and Enter
Restart MySQL and nginx
sudo service mysql restart
sudo service nginx restart


