 Configure Deluge Reverse Proxy nginx Linux to conveniently access your torrents on your home media server or NAS. When you are away from home then you can log in to your server and see the Deluge web interface. For ultimate convenience with your reverse proxy for people with dynamic IP addresses, use a free dynamic DNS service like AfraidDNS (guide for automating), DuckDNS or No-IP.
After implementing a Deluge Reverse proxy you can access Deluge via your custom DNS address like http://htpcguides.crabdance.com/deluge instead of http://IP:8112. This Deluge reverse proxy how-to was tested on Debian and Ubuntu but the nginx virtual host should work on any Linux system (CentOS, Red Hat, Fedora, Arch etc).
| VPN Service | ||||
|---|---|---|---|---|
| Private Internet Access | ($3.33 / month) | |||
| Pure VPN | ($4.91 / month) | |||
| IPVanish | ($6.41 / month) |
Configure Deluge Reverse Proxy nginx Linux
In order for Deluge to accept reverse proxy connections from nginx you need to have the WebUI plugin enabled. Then you just make a simple modification to the nginx virtual host to enable the Deluge nginx reverse proxy.
Prepare Deluge for Reverse Proxy
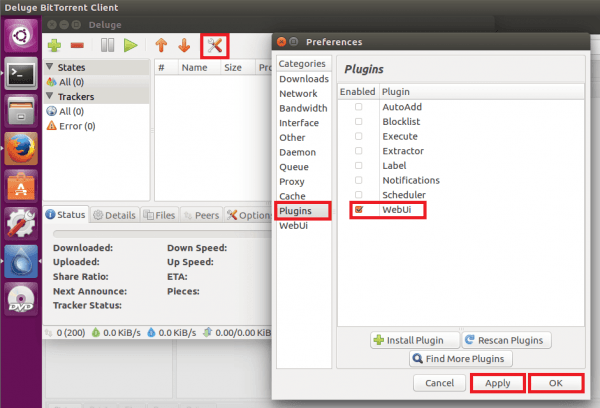
Open the Deluge client and click the settings icon and then Plugins in the left pane.
Check WebUi, then hit Apply and OK.
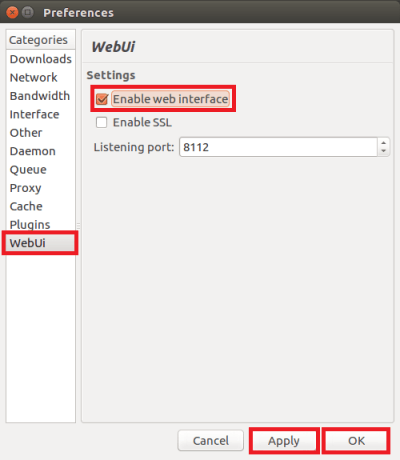
In the left pane you can choose WebUi to set the port to which nginx will reverse proxy
Make sure Enable web interface is checked and note the port used is 8112, you can change it if you want a different port.
Click Apply and then OK.
Try accessing the Deluge Web interface on http://IP.address:8112
If you are prompted for a password it should be deluge. If the default deluge password fails you can reset the web interface settings so the password is deluge. Alternatively you can reset the password with this script.
sudo find / -iname web.confDelete the files the command above returns and restart Deluge, for example
sudo rm /home/htpcguides/.config/deluge/web.conf
sudo service deluged restart
Now you can move on to the nginx section.
Configure nginx Reverse Proxy for Deluge
Install nginx
sudo apt-get update
sudo apt-get install nginx -y
Unlink the default nginx virtual host
unlink /etc/nginx/sites-enabled/defaultCreate the nginx virtual host file
sudo nano /etc/nginx/sites-available/reversePaste the nginx Deluge configuration borrowed from here and replace htpcguides.crabdance.com with your dynamic DNS address and 192.168.40.100 with the device's local IP.
Usually for reverse proxy support we set a custom web root in the application itself but Deluge support setting a special header for the web root. Here the web root is deluge, it must match for the location and the X-Deluge-Base header.
This assumes Deluge is running on the same device as nginx, if it isn't then change 127.0.0.1 to match the local IP address of Deluge
If you already have an nginx reverse proxy virtual host you only need to add the location block (do not copy the last } at the bottom)
server {
listen 80;
server_name htpcguides.crabdance.com 192.168.40.100;

    location /deluge {
     proxy_pass        http://127.0.0.1:8112/;
     proxy_set_header  X-Deluge-Base "/deluge/";
    }
}
Ctrl+X, Y and Enter to save the deluge nginx reverse proxy virtual host
Symbolically link the virtual host so nginx will load it when the service is reloaded
ln -s /etc/nginx/sites-available/reverse /etc/nginx/sites-enabled/reverseTest the nginx configuration is valid
sudo nginx -tIf you got no errors then restart nginx
sudo service nginx restartNow you can use your local IP address or dynamic DNS address to access Deluge outside your home network
If you want to use SSL and you should if you are accessing over the internet to keep your login credentials encrypted, see this guide to generate the SSL certificates.


