 Configure your Radarr reverse proxy with nginx on Linux for convenient remote access. I’d recommend using a free dynamic DNS service like AfraidDNS (guide for automating), DuckDNS or No-IP so you can access Radarr over the internet with an address like htpcguides.crabdance.com instead of your dynamic IP.
After completing this Radarr reverse proxy tutorial you will be able to access Radarr using your custom DNS address instead of http://IP:7878. This tutorial was tested on Debian and Ubuntu but the nginx virtual host should work on any Linux system (CentOS, Red Hat, Fedora, Arch etc). I will assume you followed the Radarr installation guide for Debian 8.
| Usenet Provider | |||||||
|---|---|---|---|---|---|---|---|
| UsenetServer | |||||||
| Newshosting | |||||||
| Frugal | |||||||
| Usenetlink |
Configure Radarr nginx Reverse Proxy on Linux
Enabling a nginx reverse proxy for Radarr requires setting a custom web root much like you do in Sonarr, CouchPotato, SickRage and other automation software. First we will prepare Radarr to support the reverse proxy and then enable the correct nginx virtual host settings.
Prepare Radarr for the Reverse Proxy
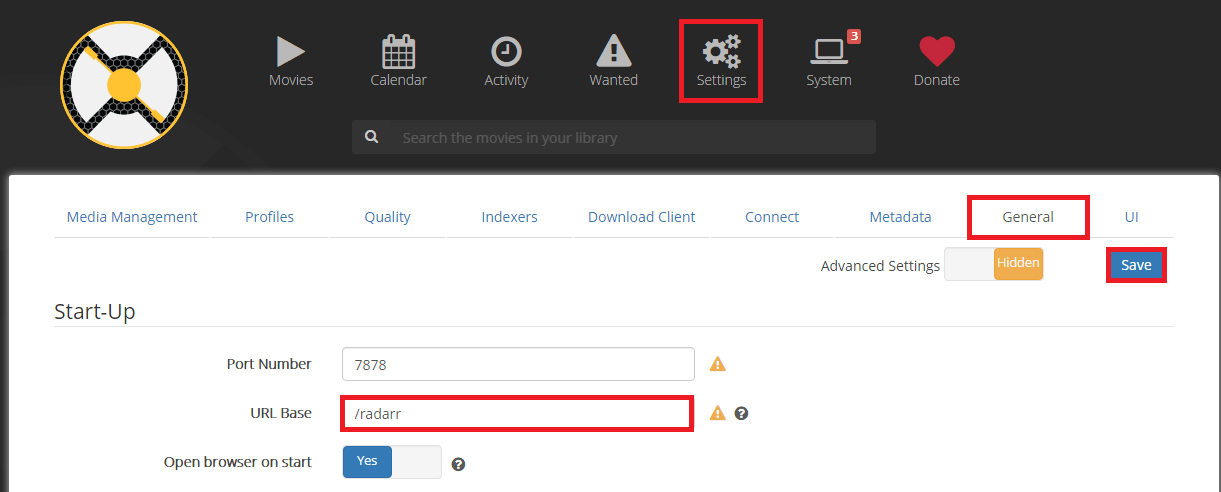
We need to change the URL base so that nginx can proxy to Radarr properly.
Go to Settings then the General tab and enter /radarr as the URL base.
Click Save.
Enable the Radarr nginx Reverse Proxy
Install nginx
sudo apt-get update
sudo apt-get install nginx -y
Unlink the default nginx virtual host
sudo unlink /etc/nginx/sites-enabled/defaultCreate the Radarr nginx reverse proxy virtual host
sudo nano /etc/nginx/sites-available/reversePaste this working Radarr reverse proxy nginx virtual host. Make sure the location matches what you set as your URL base. If Radarr listens on a port different than 7878 then change that too.
Change htpcguides.crabdance.com to match your dynamic DNS address and adjust your local IP address (here 192.168.40.105).
If you already have a reverse proxy set up then only add the blue location block.
server {
    listen 80;
    server_name htpcguides.crabdance.com 192.168.40.105;

location /radarr {
    proxy_pass http://127.0.0.1:7878;
    proxy_set_header Host $host;
    proxy_set_header X-Real-IP $remote_addr;
    proxy_set_header X-Forwarded-For $proxy_add_x_forwarded_for;
  }
}
Ctrl+X, Y and Enter
Link your Radarr nginx virtual host into sites-enabled
sudo ln -s /etc/nginx/sites-available/reverse /etc/nginx/sites-enabled/reverseTest nginx to make sure your configuration has the correct syntax
sudo nginx -tIf you got no errors then restart nginx to activate the Radarr reverse proxy
sudo service nginx restartNow you can access Radarr via your reverse proxy with you dynamic DNS address or IP at http://ip.address/radarr.
Please take a look at using https with your reverse proxy and consider using http authentication to prevent brute force attacks with this guide.

