 Raspberry Pi 2 and related devices have become quite popular NAS home media servers. I have previously released images that are already loaded with the standard services like Plex, NZBGet, SickRage, Sonarr, CouchPotato and Transmission.
I realize some people may want to pick and choose which services are installed so I forked Igor's debian micro server script and adapted it to include many media server goodies – dubbed the HTPC Guides Media Server Installer. I have provided a free image at the bottom of this post which has a Minibian base and the media server installer pre-installed for your convenience. The image will work on Raspberry B+ and Pi 2 units although there are some limitations for the B+.
The installer will be expanded to include x86 and x64 Ubuntu and Debian systems in the future, forks will not be necessary as development will be maintained by me as a school project.
Update March 5, 2016 – Kernel 4.1 Minibian Jessie available
Update September 16, 2015 – Kernel 4.1 Jessie with eth0 bugfix (thank you RandomStranger)
Update September 14, 2015 – Kernel 4.1 and Jessie with latest updates
Update August 15, 2015 – Kernel 4.1 and Jessie Minibian image available
Update July 22, 2015 – Kernel 4.0 image available below
Get your Banana Pi and Banana Pi Pro image here.
When you have finished installing and customizing your image, shrink it and back it up.
If you are trying to figure out which hardware would work best for you, consider reading the Pi benchmarks.
| Pi Unit | ||||||||
|---|---|---|---|---|---|---|---|---|
| Raspberry Pi 3 | Quad Core | |||||||
| Raspberry Pi 2 | Quad Core | |||||||
| Raspberry Pi | Single Core | |||||||
| Banana Pi | Dual Core | |||||||
| Banana Pi Pro | Dual Core |
The list of services that the HTPC Guides Installer includes is in the table below
It works well with UsenetServer and Astraweb for usenet, read more about usenet.
Torrent fans be safe with Private Internet Access for secure torrenting.
Login/Password | |||
|---|---|---|---|
Install HTPC Guides Media Server Installer
There are two options, clone the simple installer yourself from github onto your existing Raspbian SD card installation. It is designed to be used on a fresh system and supports Wheezy and Jessie at the moment. The other option is to download the Minibian image at the bottom of this post which has the installer preloaded for your convenience. The login credentials are root/htpcguides and pi/htpguides, for security reasons follow the initial setup guide to reset your SSH keys and password.
Make sure you run raspi-config to expand the SD card by choosing Expand file system and then rebooting
raspi-configReconfigure keyboard layout
sudo dpkg-reconfigure keyboard-configuration
sudo service keyboard-setup restart
Update your repositories and upgrade
sudo apt-get update
sudo apt-get upgrade -y
Note: If you downloaded the image you do not need to install git or re-clone, skip down to Running the HTPC Guides Media Server Install
To install the HTPC Guides Media Server Installer yourself, you need git
sudo apt-get install git -yGit clone the latest HTPC Guides Media Server Installer
sudo git clone https://github.com/blindpet/MediaServerInstaller /root/HTPCGuidesRunning the HTPC Guides Media Server Installer
Switch to root if you are not already running as root.
sudo -iEnter the HTPC Guides installer folder
cd /root/HTPCGuidesMake sure the HTPC Guides installer is up to date
sudo git pullExecute the installer
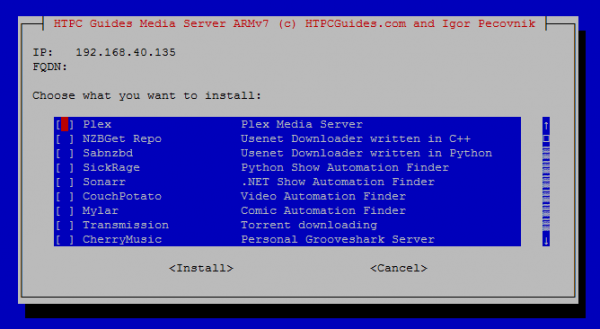
sudo bash install.shSome required components will be installed, then you will be shown the installer menu.
Choose the item you want installed by pushing the Space bar key.
Install one program at a time.
Then click Tab to get to the Install button and press Enter.
You must be careful to enter users that exist when you are prompted and proper port numbers (i.e. not text but numbers)
For each program you will be prompted for the user to run the program as, this must be a user that exists or the installer will exit. You should make sure the user has permissions for the directory you will be storing your media files.
Make sure you exit sudo mode when you are done, this is necessary to run Ubooquity for the first time
exitPlex will run on any ARMv7 device but will not run on the Raspberry Pi B+.
I consider the installer in beta currently because I have had issues with Ubooquity autostarting, I am trying to resolve them.
Download Raspberry Pi Image
Share this post to get the image, please report any issues you have here.
If you can't see the image below whitelist this site in Adblock 😉
Use PuTTY or an SSH client to log in to the Pi to avoid getting wrong password errors if you use a non-US keyboard.
There is no desktop environment provided with this image (you can install one), it is a headless server image.
The SSH login user is root/pi password: htpcguides

